|
|
Post by liteway on Mar 15, 2019 19:06:38 GMT -5
triplethreat said, Most agree it is best to leave the bike harness with its various connectors as intact as possible, to try to keep things neat. I wanted to do that, but wound up chopping it all to hell. For guys who enjoy making mods, having it all terminate on terminal boards makes changes without soldering easier. rapt9 says: I haven't chopped anything up yet, but I will. The donor is a 920cc Virago 1983, and those had the big screen right ahead of the tank, and wires going into it were never seen again! At first I was like "most" agreeing that it was best to leave well enough alone, but I began to see the tangle of wires that would result. So I have decided to take it one step at a time, connect what I need and jettison the rest. That '83 Virago just has way too many circuits for my taste. I understand that this is a tricycle and doesn't have to abide by automobile rules, for instance speedometer, tachometer, indicator lights are all optional, as is fuel gauge and several more electric bits. I agree about the terminal board simplifying things. |
|
|
|
Post by liteway on Mar 15, 2019 19:07:22 GMT -5
Haven't quit. Just got sidetracked. 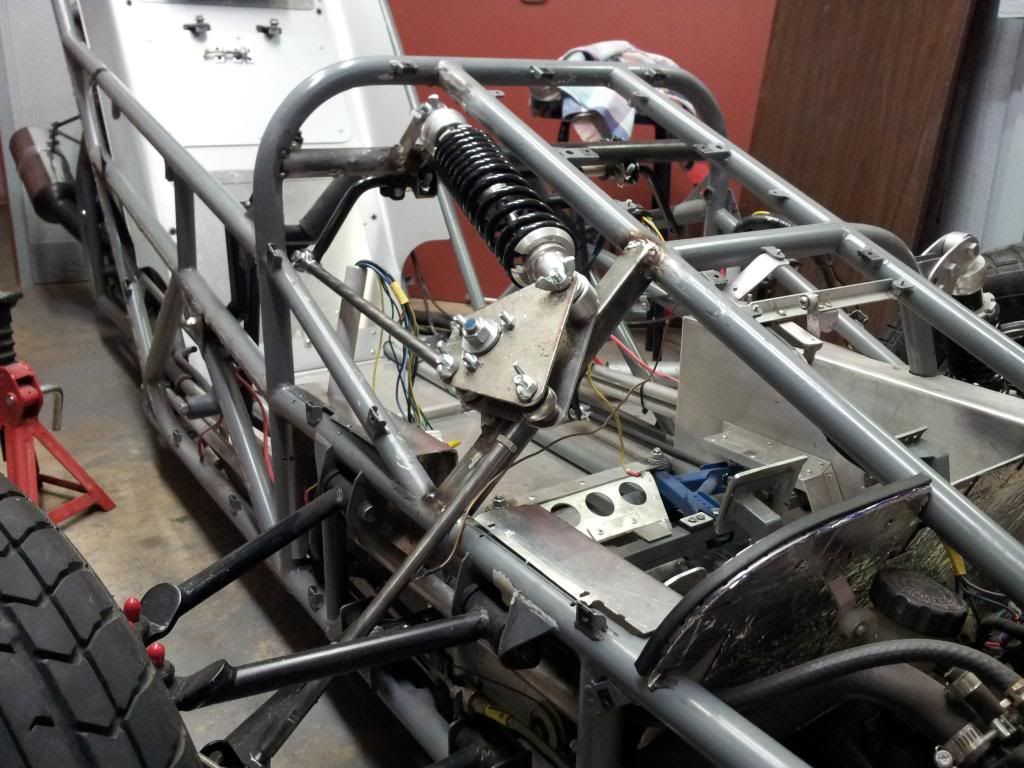 Hope the other side doesn't take another 3 weeks.  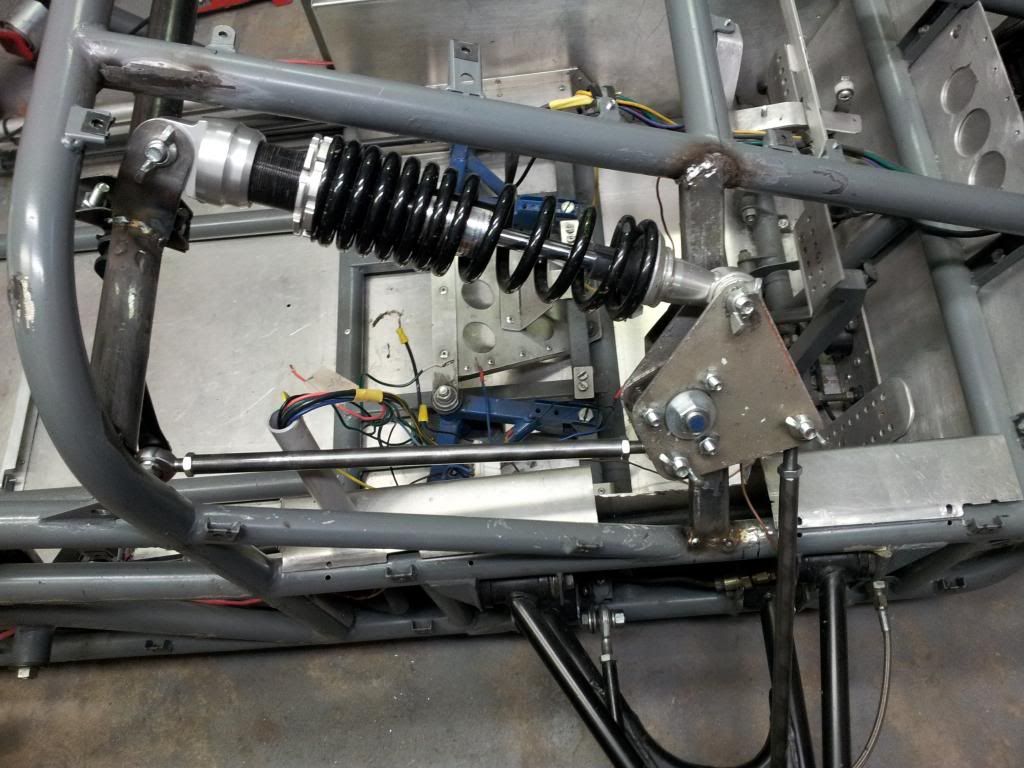 So, the whole reason for relocating your shocks, is for looks ? |
|
|
|
Post by liteway on Mar 15, 2019 19:08:01 GMT -5
No. That was a secondary purpose, along with reducing drag. Those reasons alone were not enough to justify the effort, increased complexity and weight. Main purpose is to allow use of an anti-roll bar. With the frame configuration and driver position I have, there was no way to mount an anti-roll bar without fabricating the bar itself to a custom fit. Even if I could, it would further clutter the air stream and detract from appearance. Doing it this way allowed me to use off-the-shelf hardware from the CanAm Spider. All will be enclosed with bodywork. Look closely and you will see the link at the bottom of the bell crank leading aft to the anti-roll bar where it is attached to a cross member. (Edit 10:00 am 4/15). You caught me in a contradiction. I stated at the start of the thread that I was satisfied with the way the trike worked , but not with the way it looked. Actually, it suffered a bit from excessive body roll in hard cornering, despite some pretty stiff springing. This mod should allow me to crank back on the preloads to provide a better ride as well. Yet another advantage of bell cranks is the effective spring rates can be altered by varying the distance between the main pivot bearing and links to the shock or a-arms. Roll stiffness can be varied in the same way without changing out the bar. I made the side plates separable from the bearing shells so that geometry could be altered by replacing those instead of replacing a whole welded up unit. A 3 cornered flange is welded to the bearing shell to provides a place to bolt on the side plates. Instead of this, some drill extra holes in the plate to be able to make adjustments, but the necessary distance between them means changes may be coarser than wanted and the plates themselves made bigger than necessary to provide a range of adjusment. Because they are bolted, not welded to the bearing shell, side plates are made of aluminum, making them lighter, easier to drill and cut. |
|
|
|
Post by liteway on Mar 15, 2019 19:08:47 GMT -5
Site is dead again. I'll do what I can. Still doodling new sheet metal while I work on the internals. Trying to clean it up a bit. 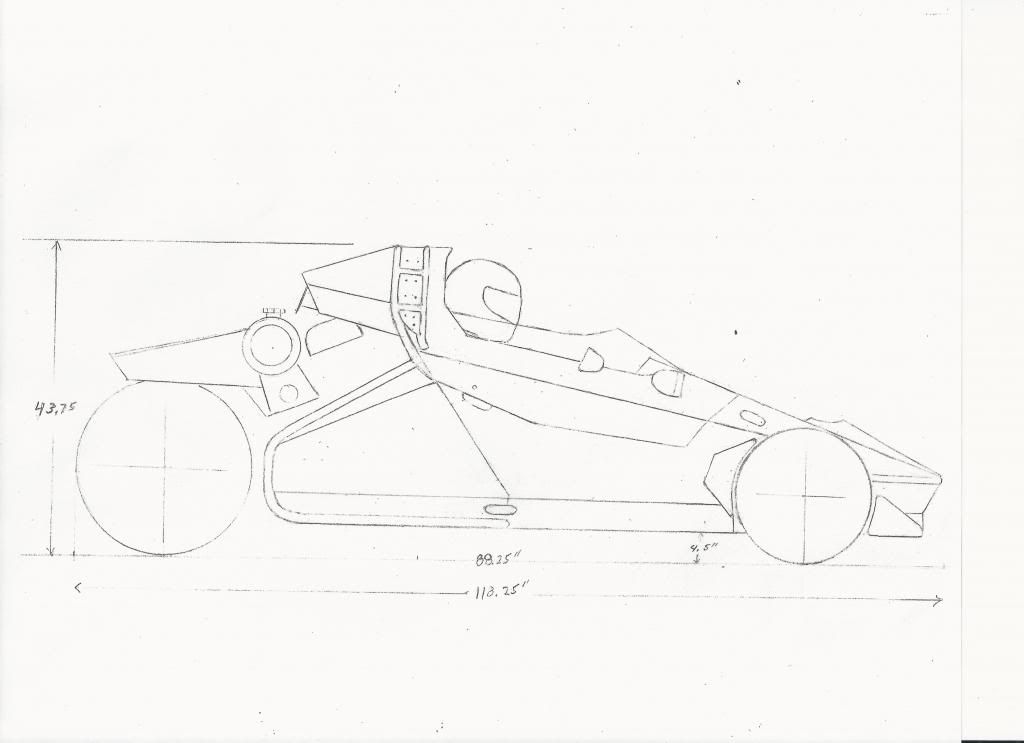 race And 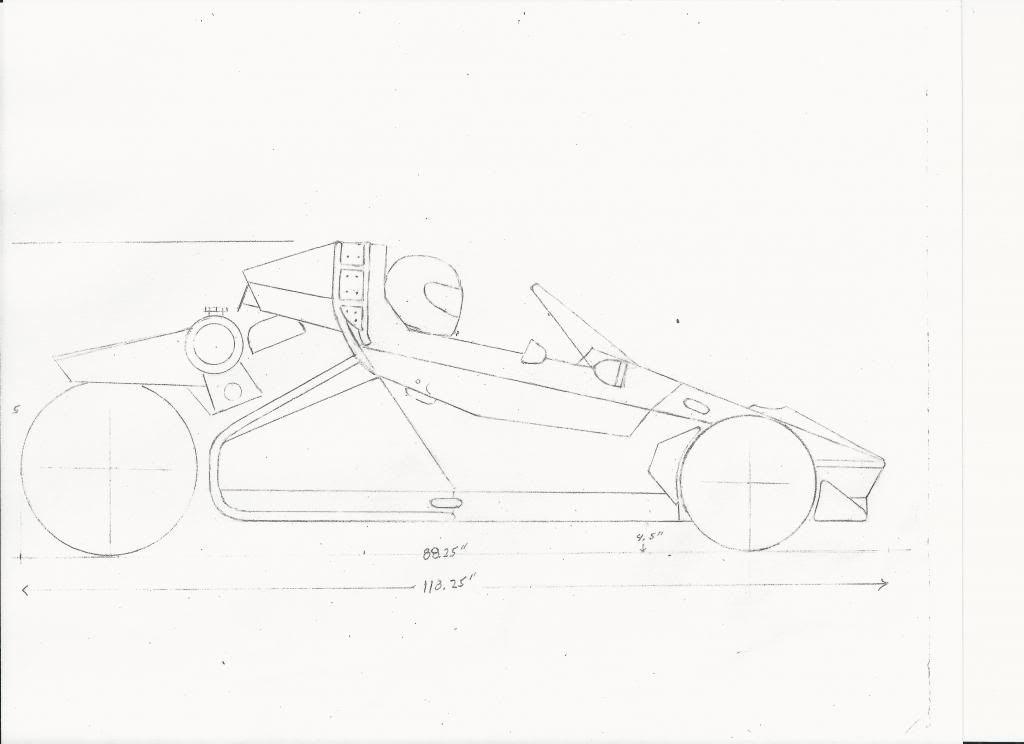 full touring 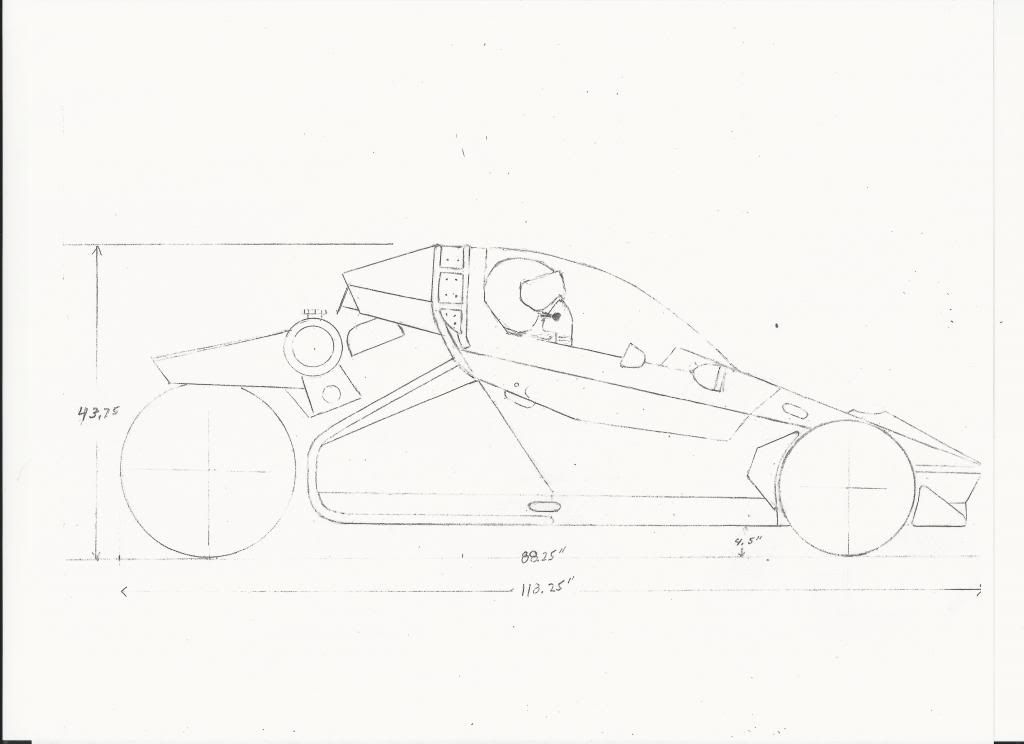 Bubble  sun protection  Weight addition will not be as bad as I feared, with 4 lbs being added for the remote spring/shock assembly and an equal amount for the anti roll bar assembly. That takes away about 1/3 of the weight saved with the new seat. Saved about 2 lbs on the head fairing mostly because I did not add back in the heat insulation and wings. Hoping the entire project will be weight neutral or maybe even add a little lightness. |
|
|
|
Post by liteway on Mar 15, 2019 19:09:26 GMT -5
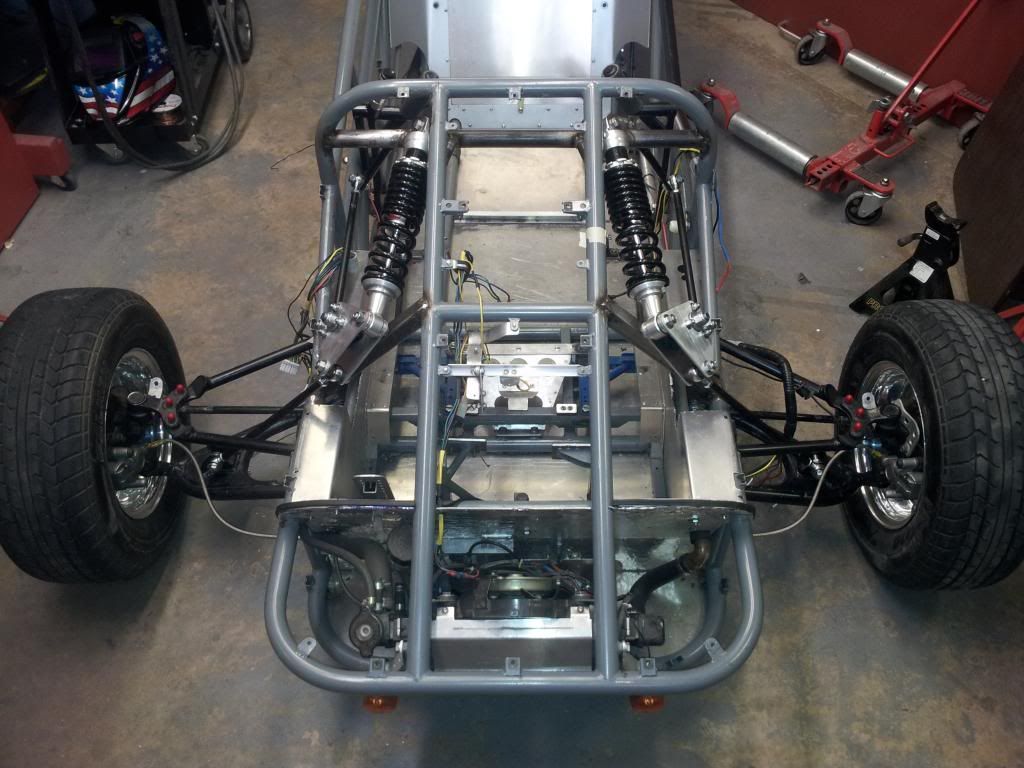 I was lucky that a frame not designed for inboard springs only needed a couple of tubes moved around to accommodate them. Seems functional enough bouncing it around in the shop, but won't know what I really have until I begin the new instrument panel and get some of the electrics hooked up for a road test. Next. |
|
|
|
Post by liteway on Mar 15, 2019 19:10:00 GMT -5
I wish I had your ability to draw by hand. The pilot is a nice touch  Looks like that front push rod suspension turned out nicely. I realize your shorter then me, but it still gets me when I see how short your wheel base is. I am pushing almost 95" and I could use an extra 2 inches to give my knees some more room. Also I know they are two force members but watch out for buckling on the push rods of that size, whats that OD? looks like 1/2". I also really like your sway bar setup, makes me think I could run that in mine but I think my knees would be unhappy. |
|
|
|
Post by liteway on Mar 15, 2019 19:10:37 GMT -5
Thinks for the compliments Andrew. Wish I had your computer skills. A shorter swing-arm accounts for much of the wheelbase difference. My homemade one is 4" shorter than the stock one was, and I would guess it in turn was a bit shorter than your factory one, as it came off an earlier design and motorcyle sportbike swing arms keep getting longer as time goes on. ( Begin Edit 4/25) Mine measures 16.5" from swingarm pivot center to rear axle center if you care to compare.(End Edit) This probably accounts for much of the difference in the weight distribution of the two trikes as well. Yes, the push rods are 1/2 inchers but I feel confident they will be ok. Indeed, they look a bit spindly compared to yours but my front end weight is 33% lighter, and the push rods look to be only about 2/3 as long. The shorter,the stiffer. Also they are made from chromoly which provides additional stiffness. Nonetheless, I'll take your concern seriously and be watching for signs of weakness. |
|
|
|
Post by liteway on Mar 15, 2019 19:11:18 GMT -5
Drug hi-tech forming tools out of attic. 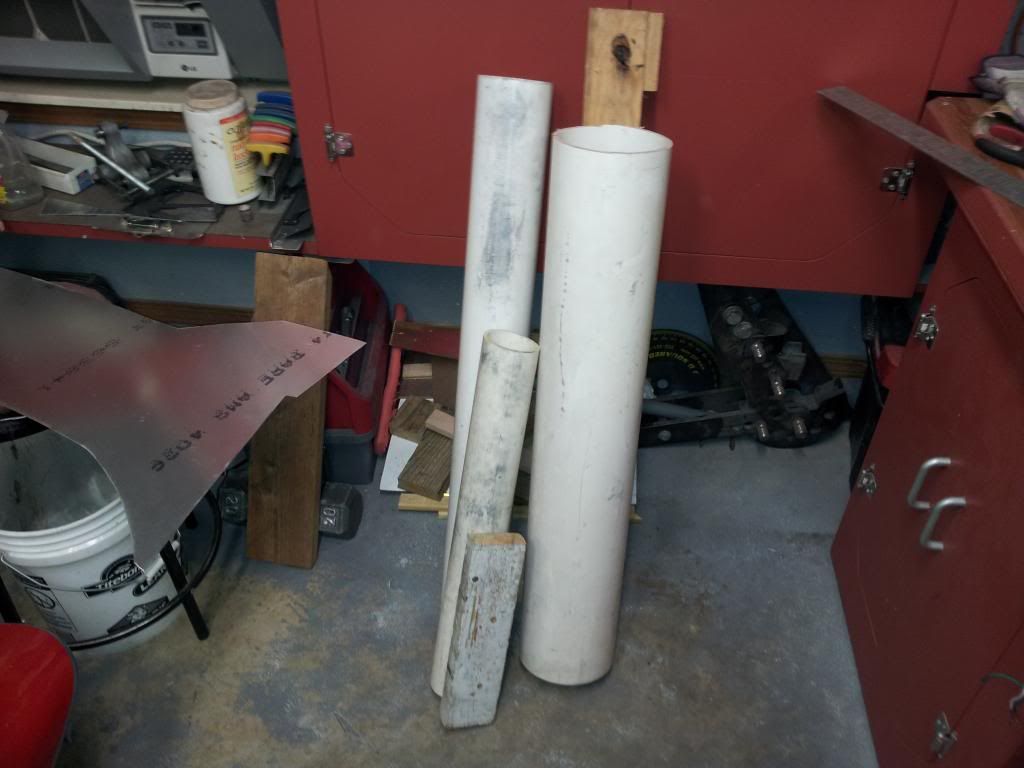 New dash is to be installed on an aluminum subframe, apart from main structure. Should collapse if banged with helmeted head. 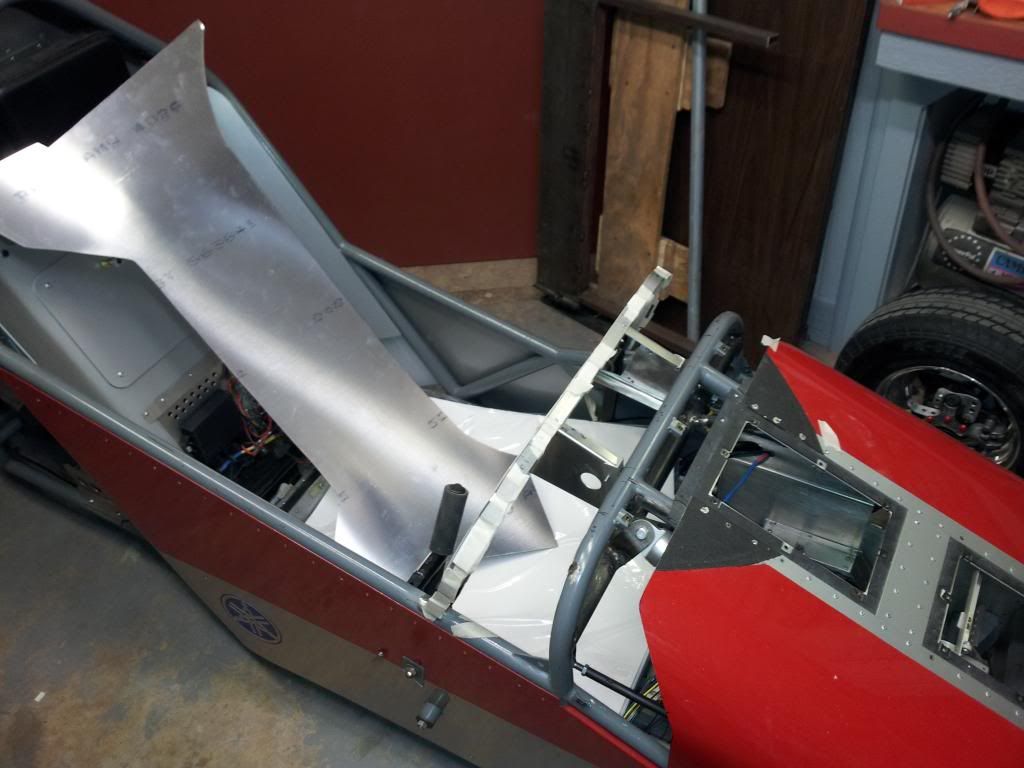 Made a pattern. 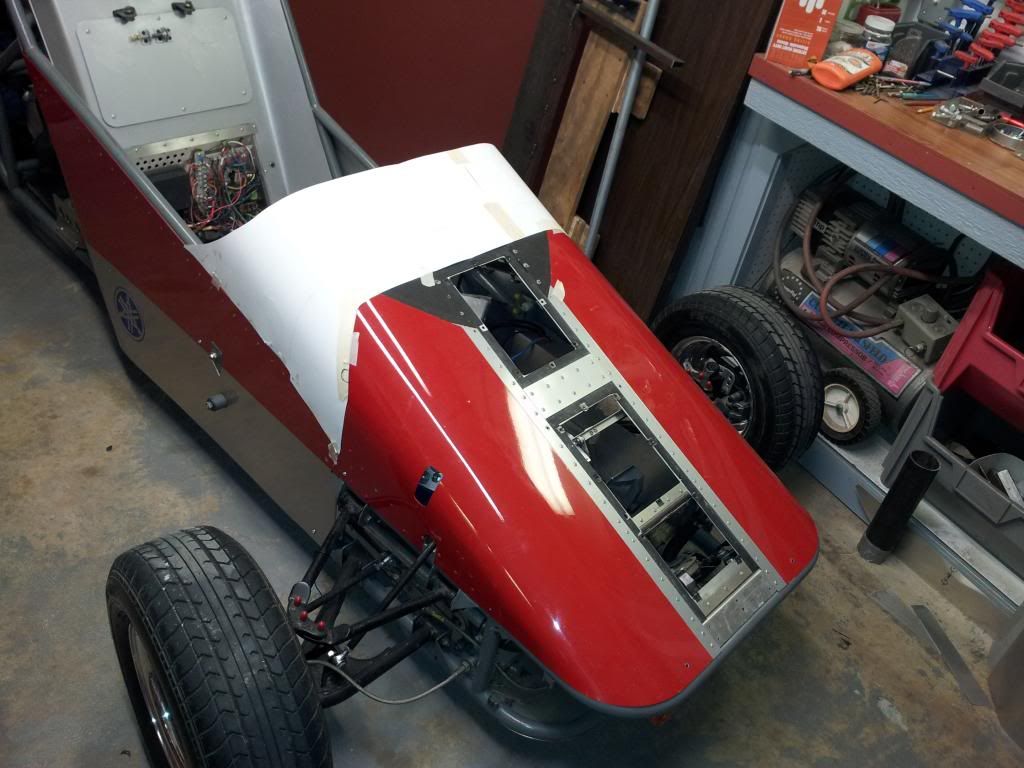 Aluminum piece cut to match. Always prefer .040 for body panels, thin enough to bend cold, thick enough to not to dent when spat upon. 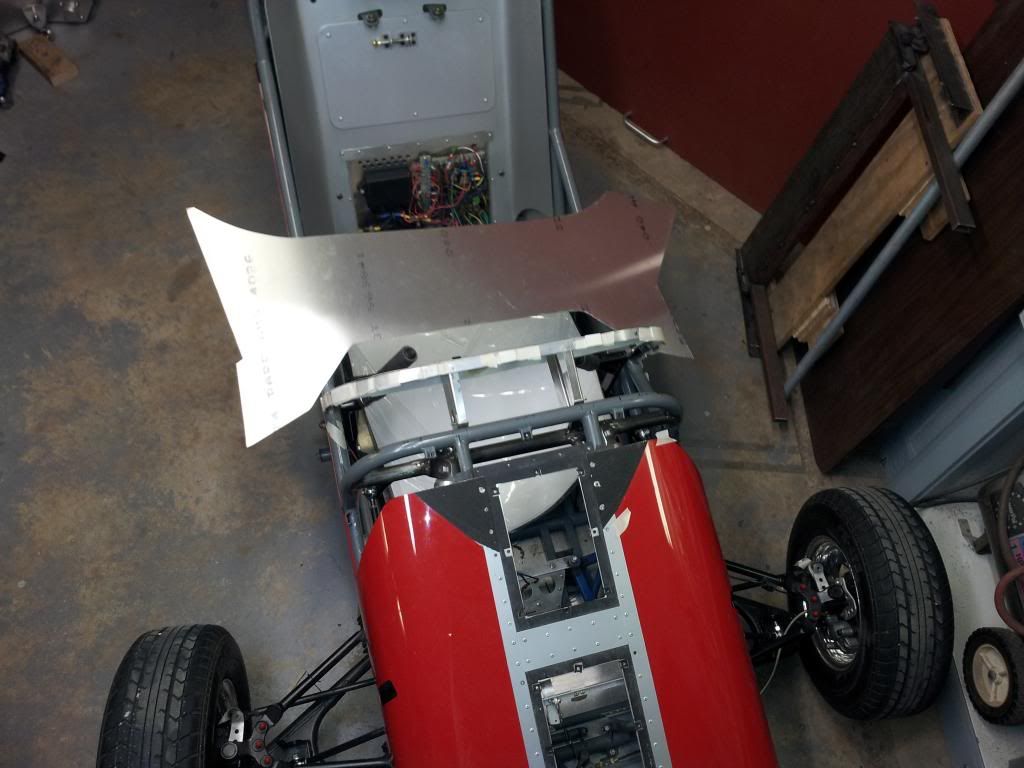 [/URL [/URL
 Cut lines are adjusted with sanding and filing as bend progresses. 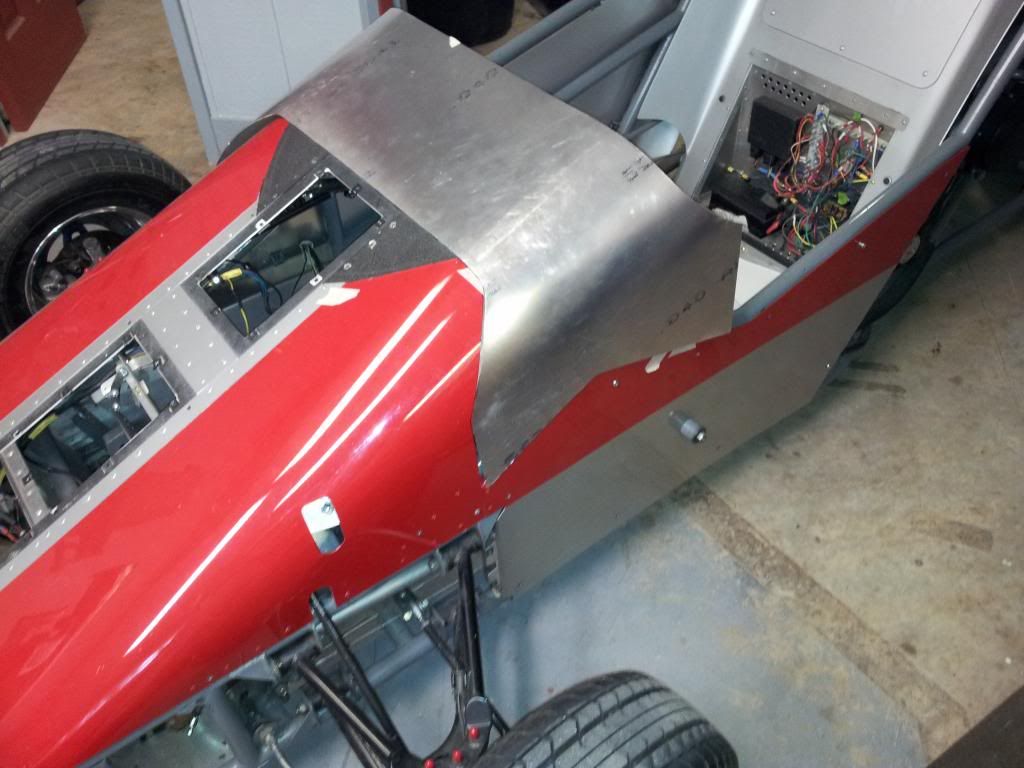 |
|
|
|
Post by liteway on Mar 15, 2019 19:12:00 GMT -5
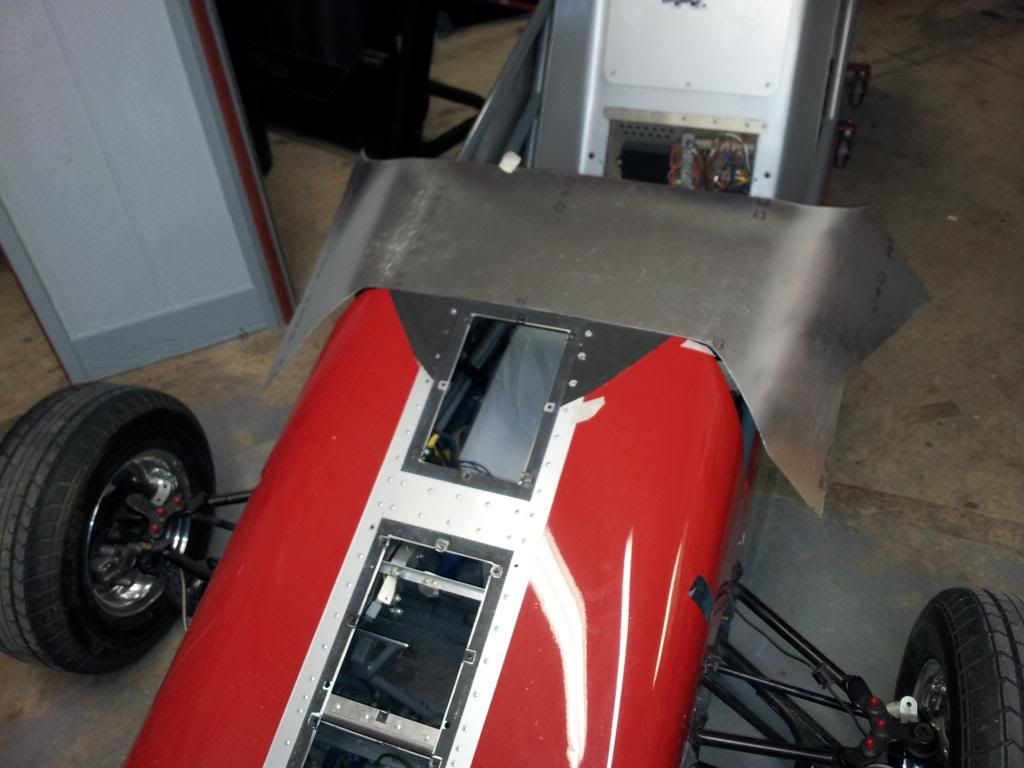
After a couple of days of trying, finally got a decent match up on the cut lines. Almost trashed the panel for new start a time or two. Rubber gasket behind the seam, worked ok to seal out rain with the old access panels, depending on the these to keep the back of the instrument panel dry. 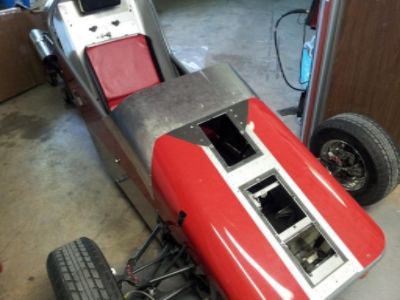 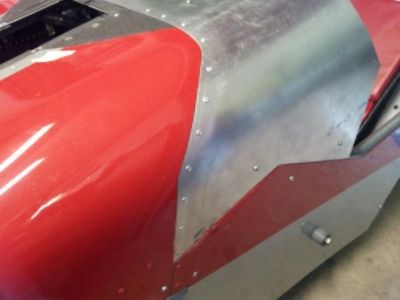 Instrument panel, second attempt, first one cut a little bit off. Made up of (what else?) .040 alu. 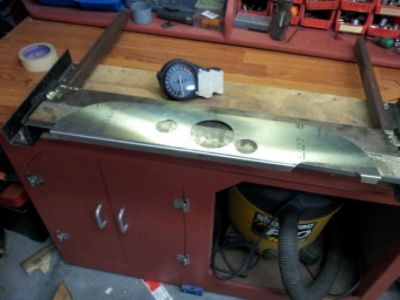 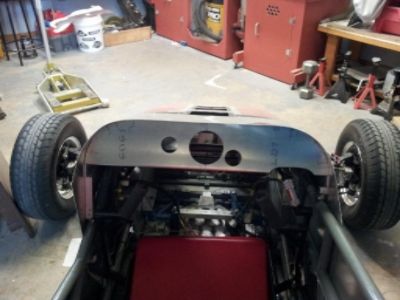 |
|
|
|
Post by liteway on Mar 15, 2019 19:12:40 GMT -5
|
|
|
|
Post by liteway on Mar 15, 2019 19:13:26 GMT -5
Hey Triplethreat- Did you show your front uprights detail in here somewhere? Just curious on some of the details with bearings and brakes. Thanks. |
|
|
|
Post by liteway on Mar 15, 2019 19:13:58 GMT -5
Brakes , spindles, hubs are from a 1989 Suzuki 250sk sport quad. Full specs can be found at "New Members" , "Greetings , here are some pictures of my trike". 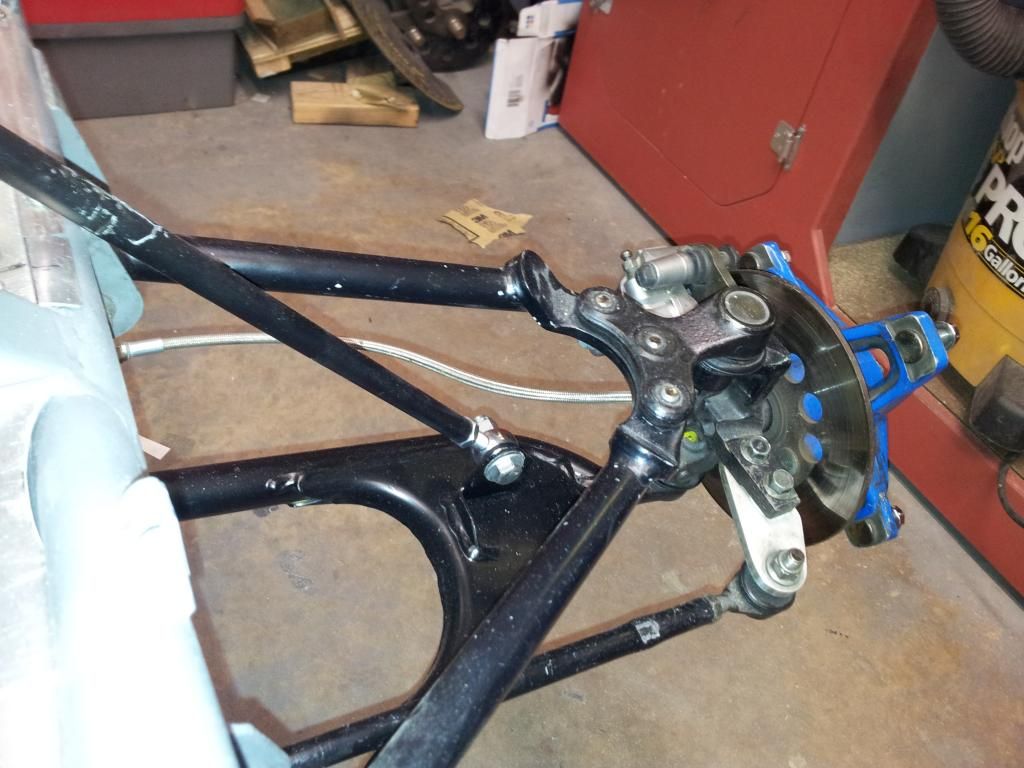 |
|
|
|
Post by liteway on Mar 15, 2019 19:14:52 GMT -5
|
|
|
|
Post by liteway on Mar 15, 2019 19:15:30 GMT -5
Still weighing options on the windscreen. Higher cowl means much less screen needed. Cut down the old screen about 30%, and leaned it back at about another 7-8 degrees. Still a little tall for viewing over, I think I'll try another 4 or 5 % back lean angle. It will then not be far off from the angle of the nose metal. 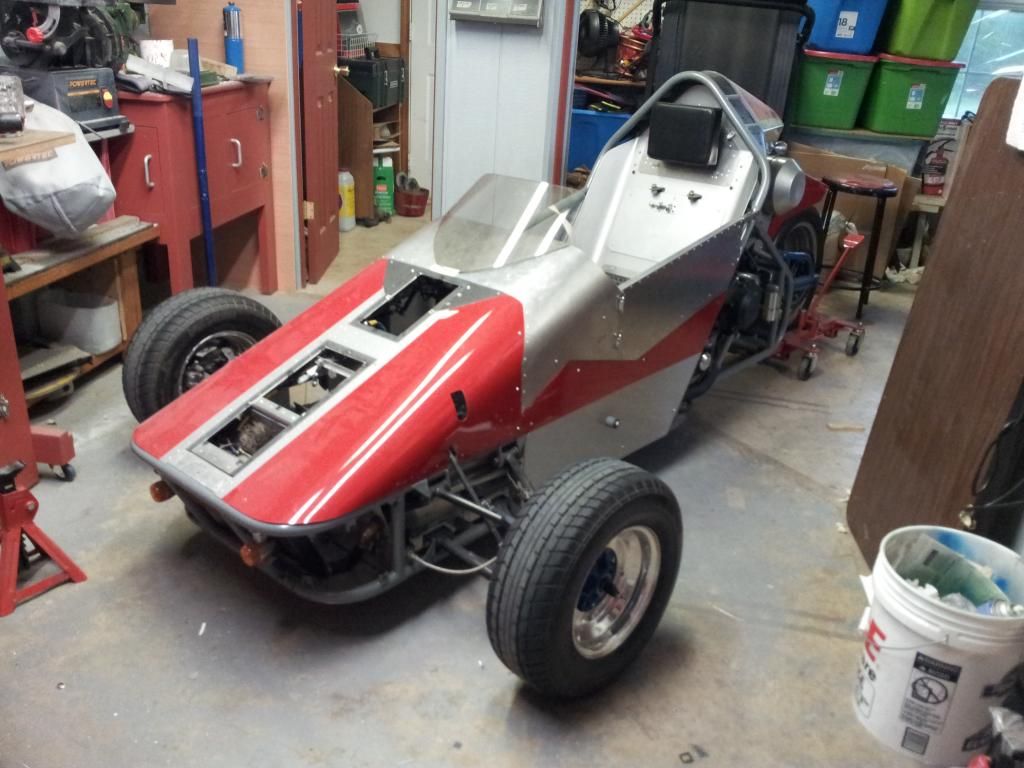 Wide angle pic in cramped shop makes windscreen look smaller than it is. Pic from back shows its still big enough to do the job. Sharp eyes may notice the door hinges as standard cabinet stuff. Should work ok with the 2.5lb door ,provided nobody tries to hold/pull themselves up on with it. Still working on the latch and latch release mechanisms. Then inner door skin can then be applied. Inside/outside skin is .050 with .060 channel ran around the edge to form a frame to which they are then riveted. Very stiff and very light. 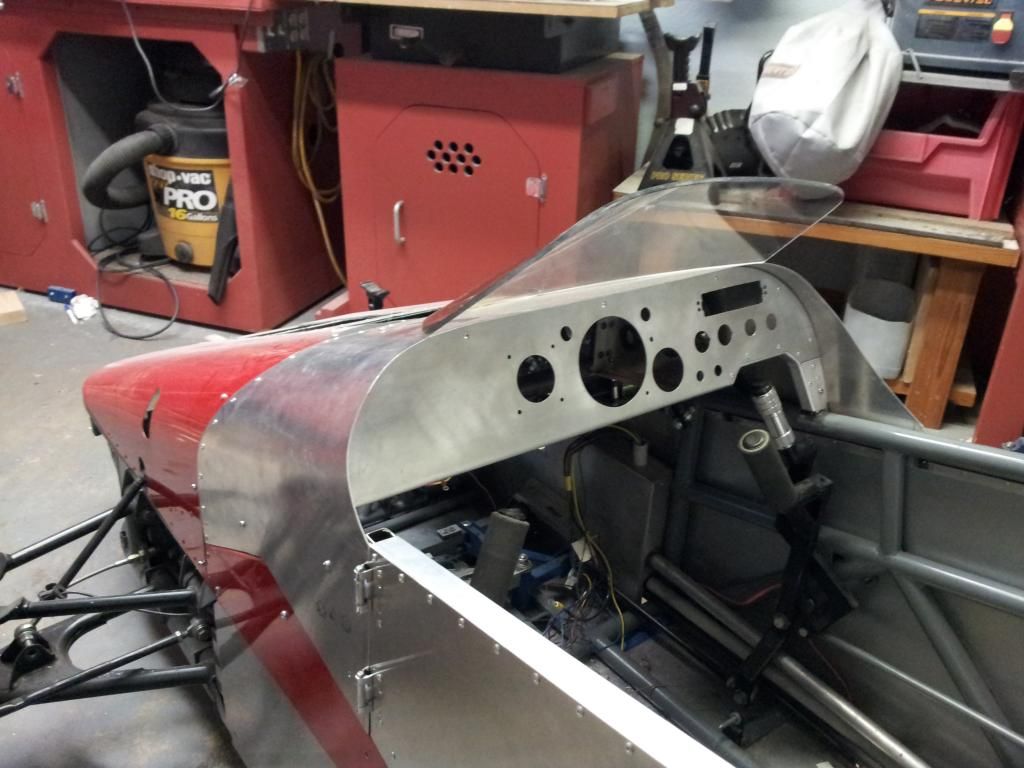 Anybody can make things light. Most folks can make things strong. Combine the two and you have it right. |
|
|
|
Post by liteway on Mar 15, 2019 19:16:54 GMT -5
The older Citroën 2CV used a swivel bar that the headlights could rotate back for High and forward for dim. No electrical to fail, just a mechanical lever to control them. Looking good. |
|
|
|
Post by liteway on Mar 15, 2019 19:17:37 GMT -5
Cool looking trike. I'm working on my build and was wondering what material you used for the floor of your trike? |
|
|
|
Post by liteway on Mar 15, 2019 19:18:11 GMT -5
6061T4 (bare) sheet Aluminum.050 in a single piece from forward to rear bulkhead. Those bulkheads being made of .070 mystery aluminum salvaged from discarded commercial signs. Very difficult to bend,at least when cold. Forward bulkhead is a stressed member bolted to the steel tube chassis and reinforced with 1/8 aluminum plate where master cylinders bolt to it. |
|
|
|
Post by liteway on Mar 15, 2019 19:18:56 GMT -5
Latch and latch release fabricated from scratch and installed. 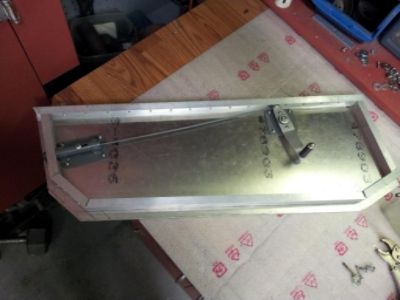 All buttoned up and installed on trike.  Covers were planned for access holes. Doesn't look so offensive as is. Covers will have wait till I am mobile again or maybe forever. 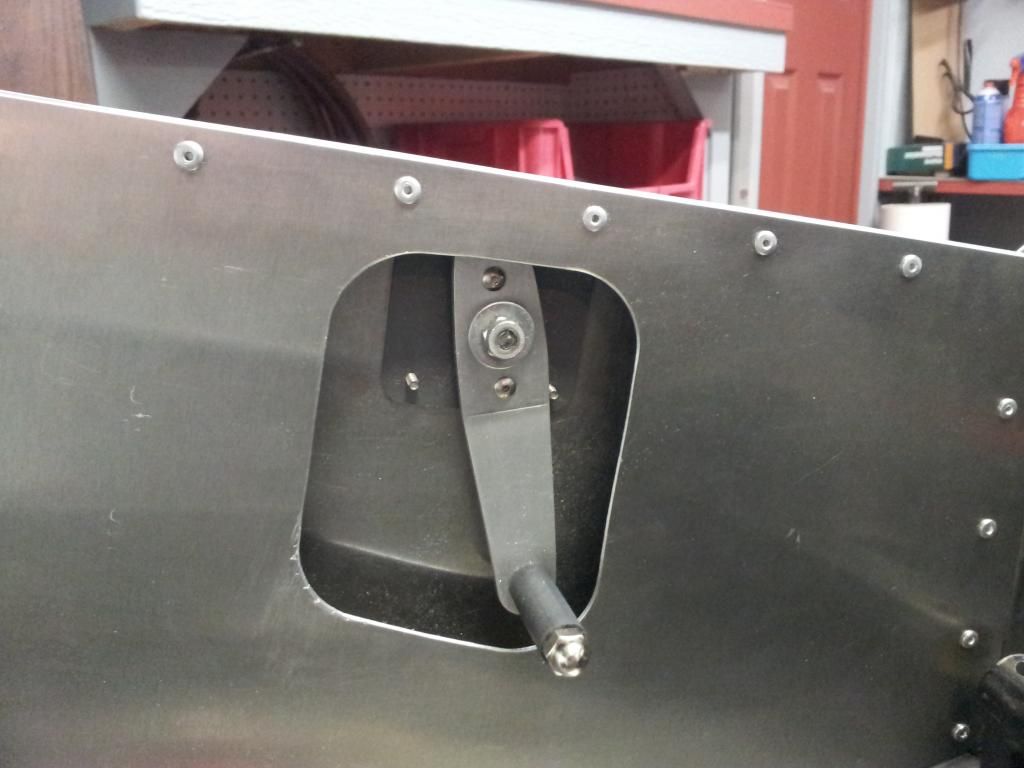 |
|
|
|
Post by liteway on Mar 15, 2019 19:19:39 GMT -5
Getting all fancy up in here...door handles! I wish I had your metal working setup, I tend to usually just hit things until they look right and I am just getting into the wonderful world of rivets. |
|
|
|
Post by liteway on Mar 15, 2019 19:20:09 GMT -5
Haven't done much lately that would make for an interesting photo, just plugging along on dozens of details. Finally got some paint on the new tubes and tabs. Very difficult to control overspray when working on a vehicle that is mostly together. I feel I have turned some kind of corner, and with fabrication mostly finished , I can start painting and reassembly. I would have preferred painting after road testing the new front suspension, but I would have had to wire out the dash to get it to point where it could be driven,then all that would have to come back out for painting. Just have to take a chance no big changes will be needed. Earlier, I had considered a complete disassembly to paint the whole frame in chrome yellow. Glad I didn't step in that cow pie. This will go on too long as is. 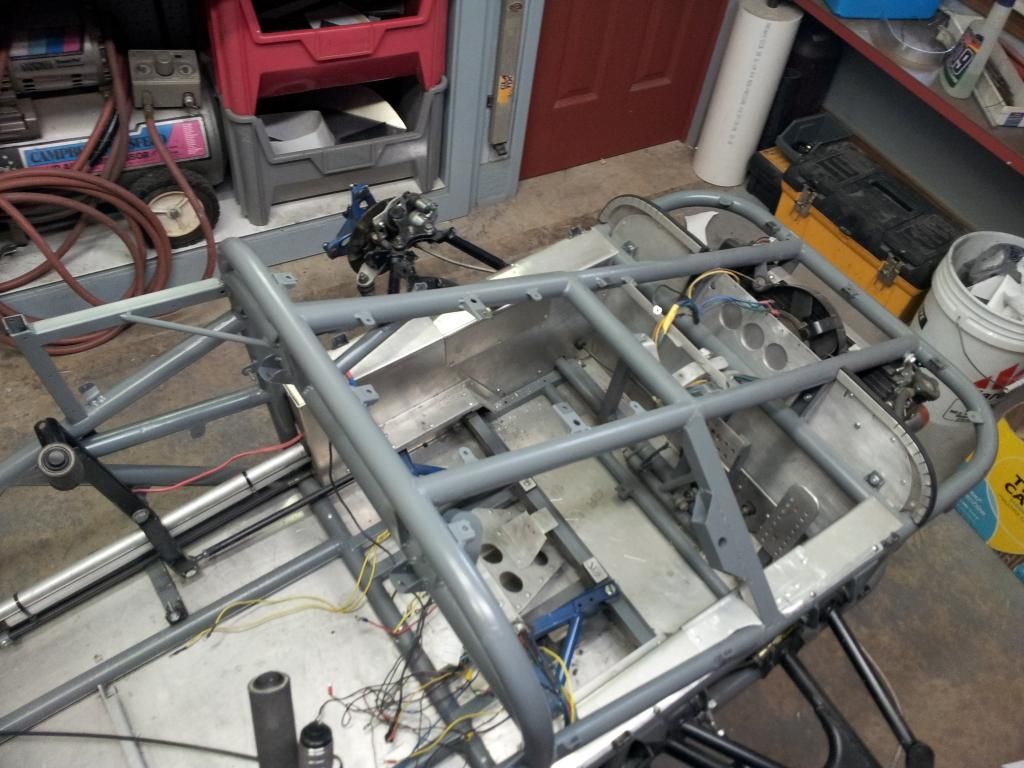 First thing in will be the dash, just painted today. 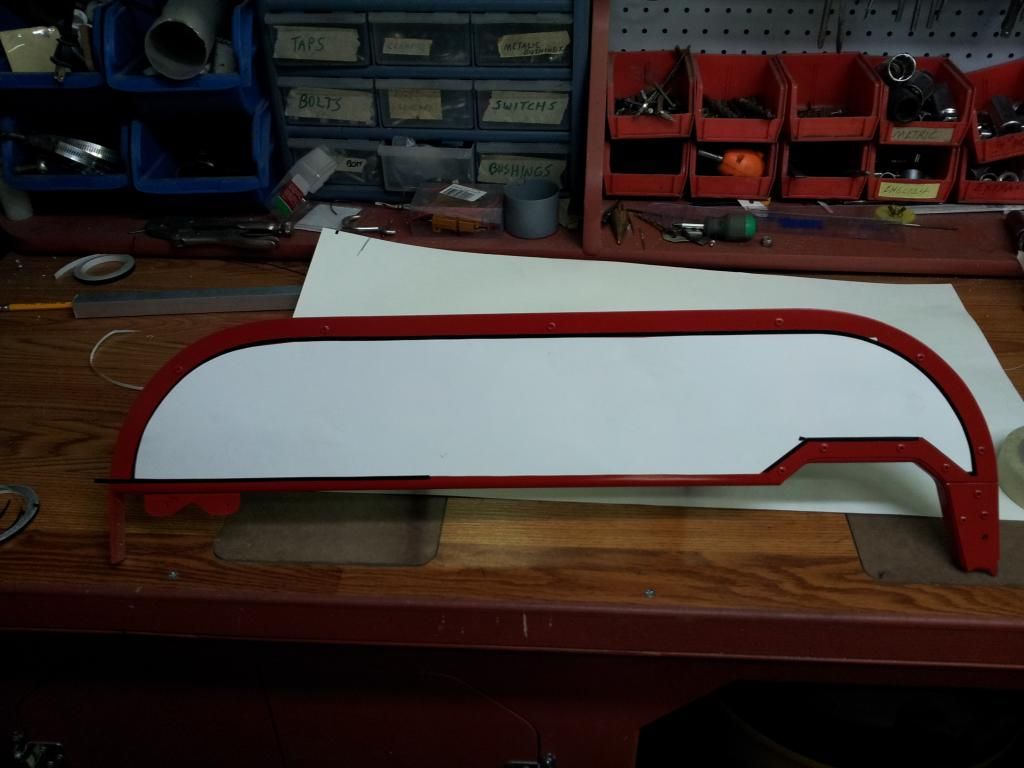 First primed and top coated in red, then cut template to provide a guide to lay on pinstripe tape. Simigloss black applied over tape and tape removed to show red stripe. Could have used tape permanently, but I don't like it. 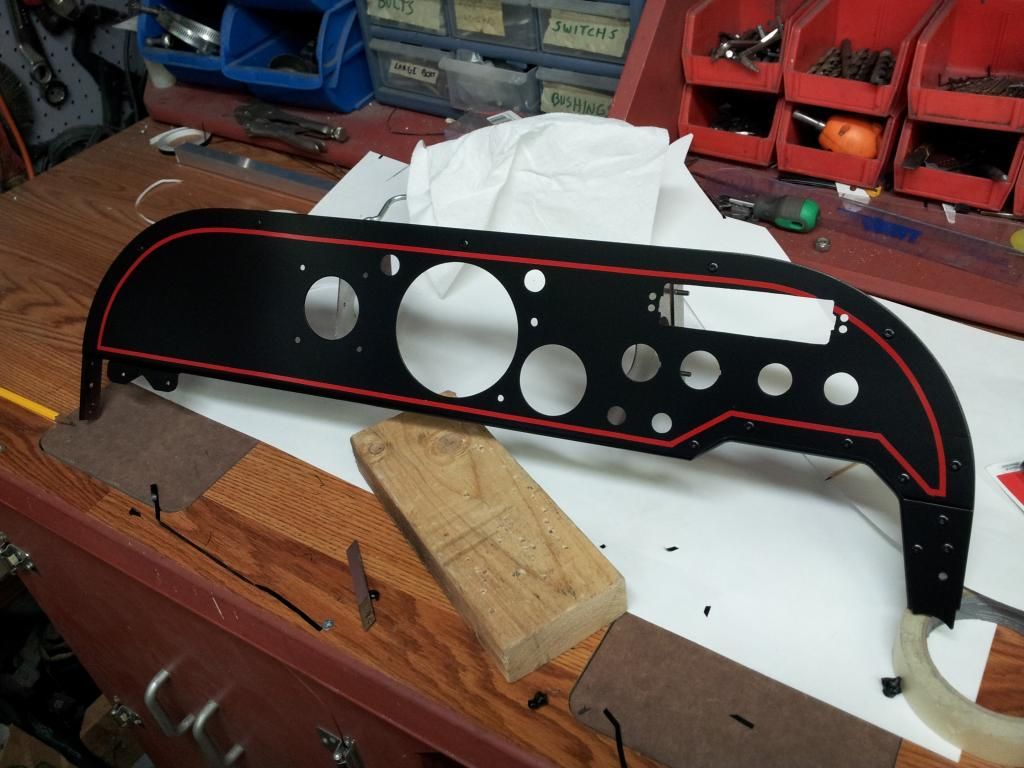 |
|
|
|
Post by liteway on Mar 15, 2019 19:20:53 GMT -5
Man, that's some gorgeous work and some brilliant engineering! It looks fantastic, even without compound curves. Please tell us more about those front fenders. |
|
|
|
Post by liteway on Mar 15, 2019 19:21:23 GMT -5
Thanks Tinhorn. Fenders were formed up in a cone with the seam and mounting plate on the inboard side. A vented butt plate and another internal crosspiece just behind the tire made up all the parts. Once again. something of a monocoque. My inabilty to make compound curves and a desire to do something different led me to this approach. Like most hub mounted fenders, bracing was the hard part. My best effort still left some jiggle over potholes. They were light, about 2.5 lbs each including all mounting hardware, but all the mass was behind the axle centerline. This put torque loads into the hub with each bump, which I feared may be bad news for ball joints over the long haul. I mounted them higher than originally planned to have less weight aft and to make bracing easier, but I didn't like the look of their leading edge sticking above the tire like an air scoop. The fenders in the pictures were destroyed in an effort to modify them to address shortcomings. Technically, fenders are required by law here, but I went without them for 2 years and the cops did not seem to mind. Lots of local hot rods don't have them. I actually prefer a fender less look and the advantages of lower un-sprung weight. Even so, to prevent road spray and gravel bits hitting other vehicles, I eventually plan to do the type of fenders in my concept drawings. These have a spoiler shaped triangle ahead of the wheel which would provide a counter balance to the mass mounted behind the wheel and might give some airo advantage. 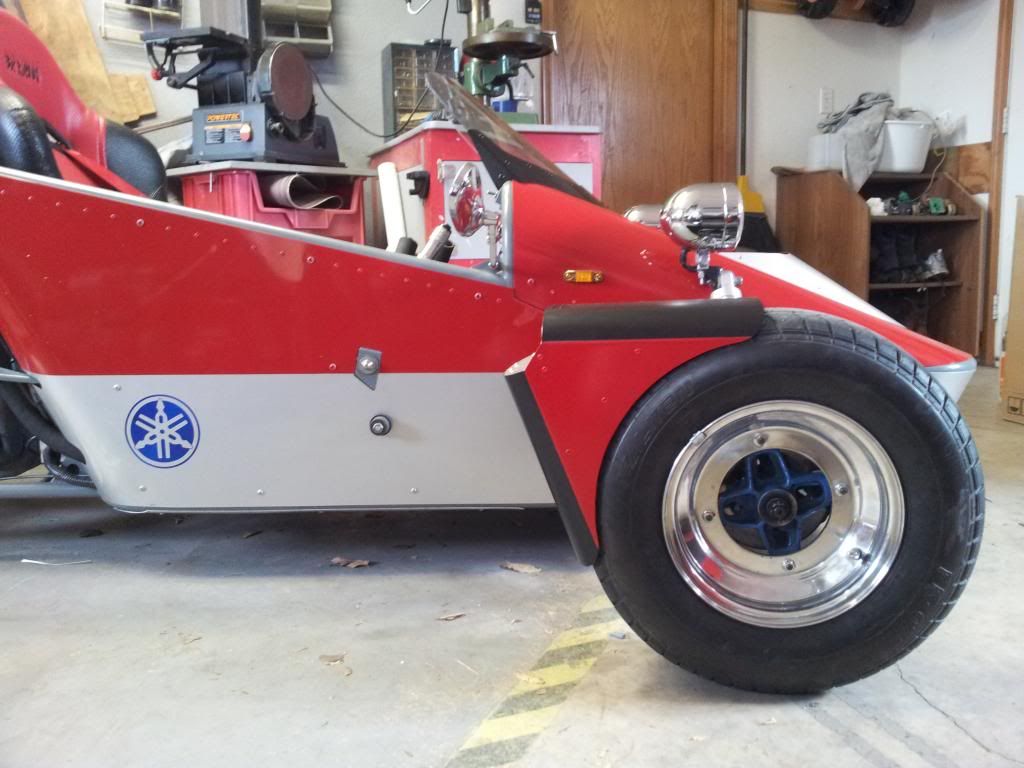 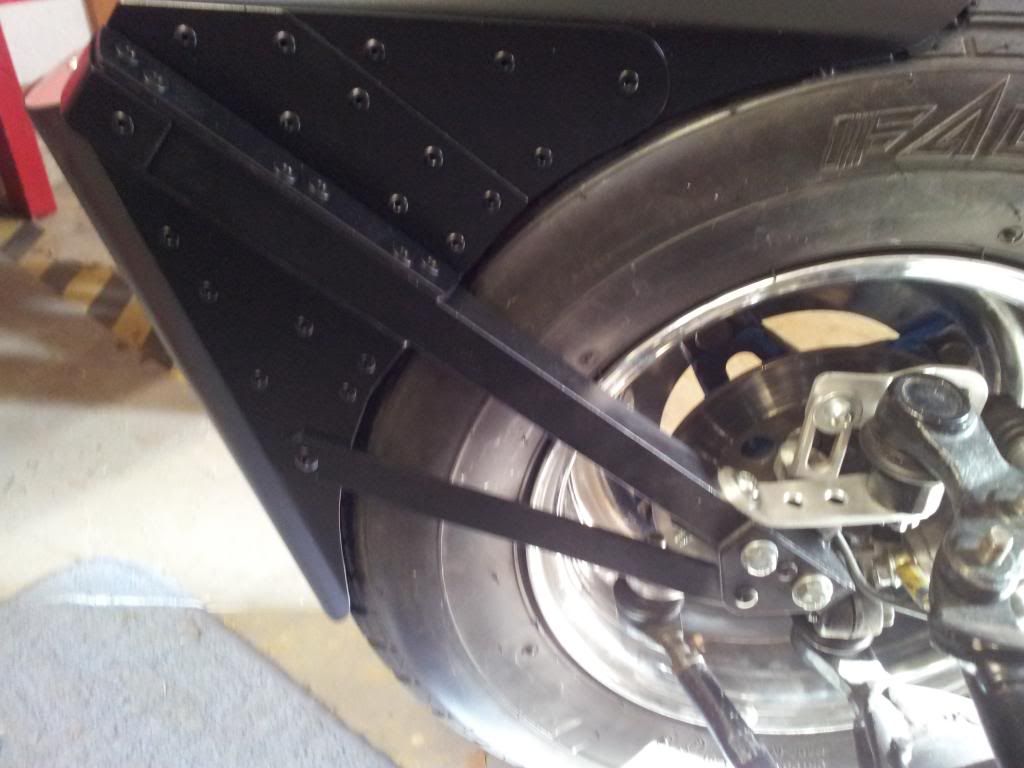 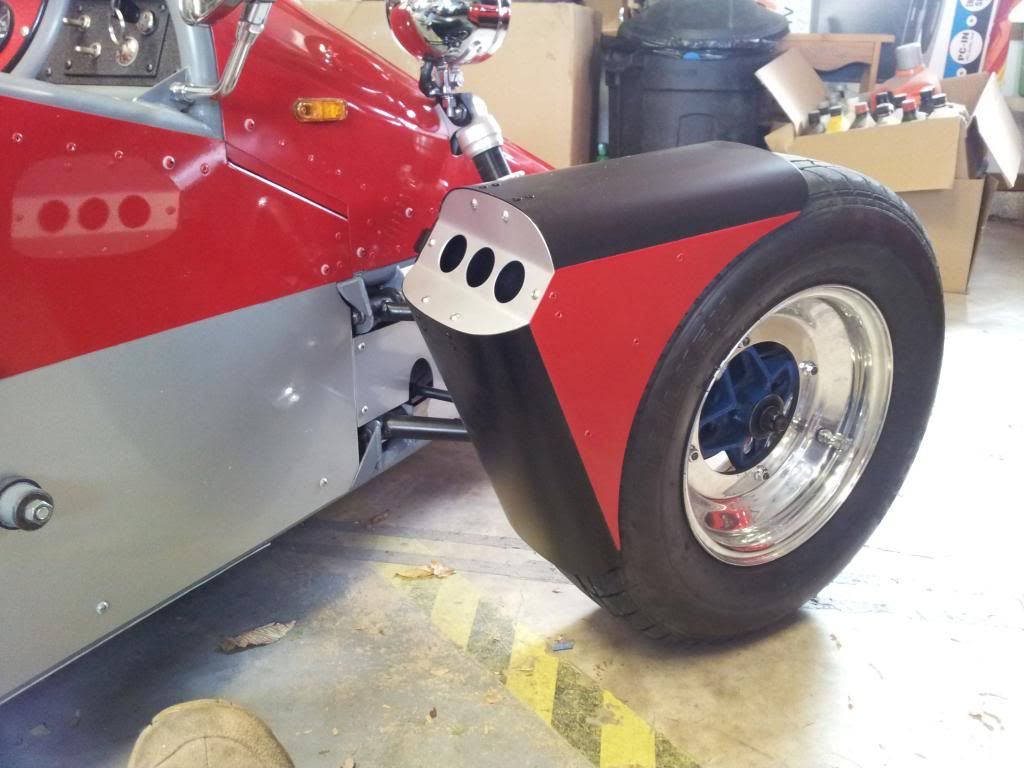 |
|
|
|
Post by liteway on Mar 15, 2019 19:22:03 GMT -5
Thanks Joker, I very much appreciate that.  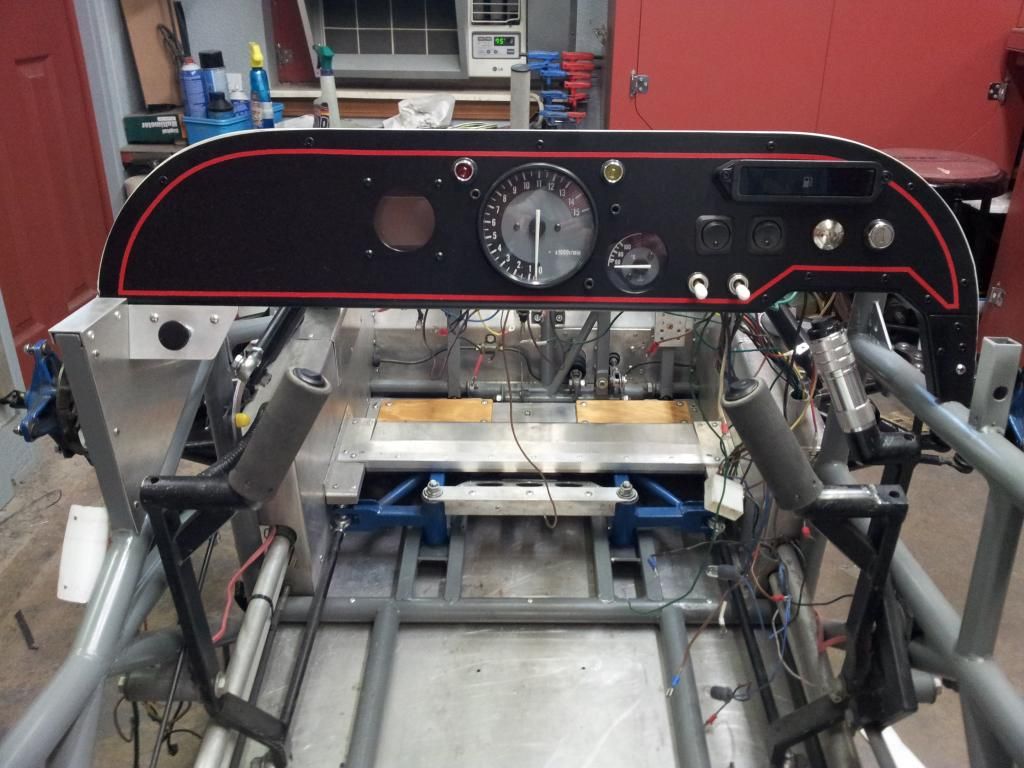 No new components here, just re-juggling the ones off the old dash. Its easy to layout when you know there will not be a steering wheel in the way of anything. |
|
|
|
Post by liteway on Mar 15, 2019 19:22:56 GMT -5
How is it a speed without a steering wheel? Do you have any means to slow the steering down so road bumps aren't fed direct to your hands? This is not a criticism, I am just curious? I like the front mudguards. |
|
|
|
Post by liteway on Mar 15, 2019 19:23:51 GMT -5
Thanks for asking. Got a lot of caster dialed in, so it has its own pretty good sense of straight ahead and requires deliberate palm pressure to change course. Even so, it reacts more quickly than the quickest of rack and pinions and first timers usually overinput overreact. It reacts with the speed of a go-kart but with much better self centering and therefore, stability. At speeds over a hundred and or in high crosswinds there is some twitchy. I did the alignment using a couple of parallel tape stripes and framing squares on my not so perfectly level garage floor. Hard to say if that last bit of twitchy is due to the the steering type, front end alignment,or aerodynamic qualities. I am confident there is no bump steer. Much easier to both produce and catch slides. You never have to reposition your hands in a wrist crossing frenzy. Riding position with arms lower is much more comfortable on lengthy trips. No need for a detachable wheel to get in/out of a tight cokpit. Initially, with the original Suzuki wheels that were offset to work with this front end, there was zero kickback. Those wheels were bent, so I was forced to buy aftermarket wheels with a 1/2" more positive offset. There is now some detectable kickback, but less than my old 88 CRX SI had. Its not a problem. In a homebuilt vehicle of this size and configuration, I would not consider the use of any other type of steering. Incidentally, I welcome criticism. Given A choice, I prefer compliments even to the most constructive criticism. Who doesn't? But,I can dish it out. Why shouldn't I take it? Beats being ignored. Won't learn much by kissing one another's butt all the time. |
|
|
|
Post by liteway on Mar 15, 2019 19:26:19 GMT -5
Glad to hear about the progress. Really looking forward to initial driving reports from you. Once running down the road, you are over a big hump. Body work is a bear, whatever the material unless you are not too particular and I don't think that's you. |
|
|
|
Post by liteway on Mar 15, 2019 19:26:58 GMT -5
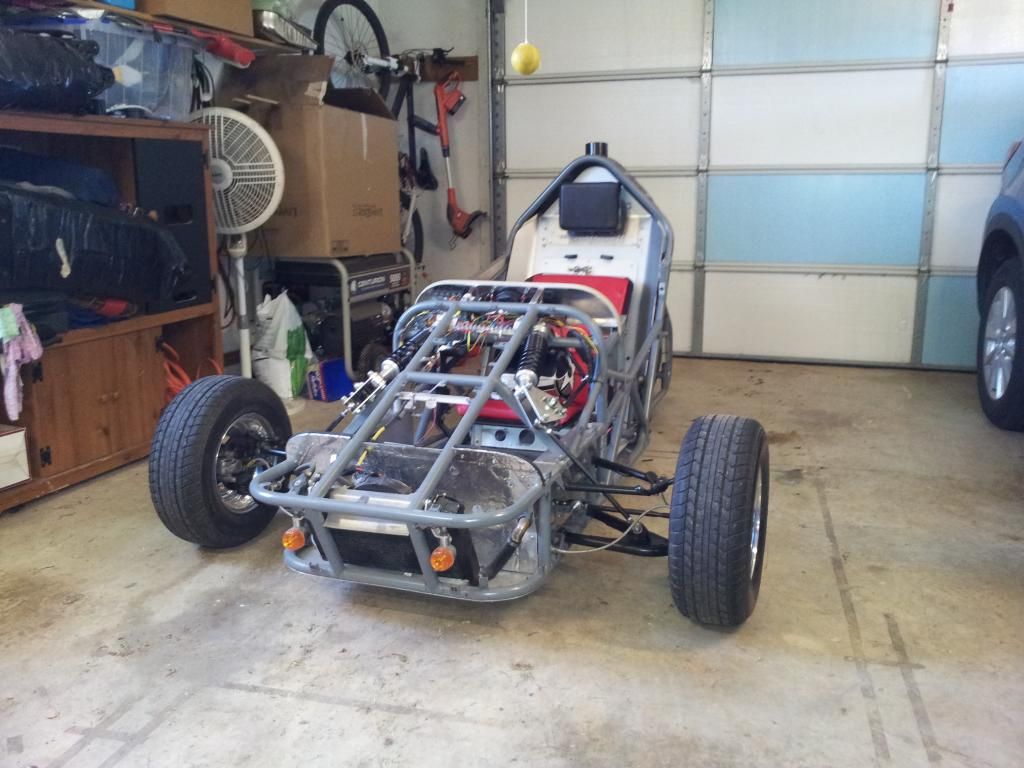 Got the wiring all done but for the headlights (more on that later) so was able to fire the trike for the first time since Feb. Could not find my blasted belts to reinstall. Couldn't wait, so I took a couple of laps around the cul de sac. Body roll is mostly controlled, reduced at least by half and comparable to most modern sports cars. Being without belts , I did not press it too much and I don't know if the tendency to lift the inside front wheel in hard cornering is eliminated or not. Certainly it is reduced and I did not encounter it at the relatively low thresholds of before. The streets here are smooth so an analysis of ride quality will have to wait for a rough road test. Can't tell a diff so far between old set up and new. I'm delighted. No new plates to make for the bell cranks. Edit/Update 11/13/14. After living with it for a while, I decided to make new bell crank plates, for a softer ride and more aggressive anti roll. Took 8 HRs! Corners flat, and rides like a caddy. Well, almost. I had been unable to work up enough nerve to get the front end to slide so still not sure that will happen before the inside wheel lifts. Wheel lifting used to happen quite often with the old set up when driving hard, but I have not had it happen at all with the new set up. Reverse trikes must have an anti-roll bar if you value cornering power. Now about those headlights. 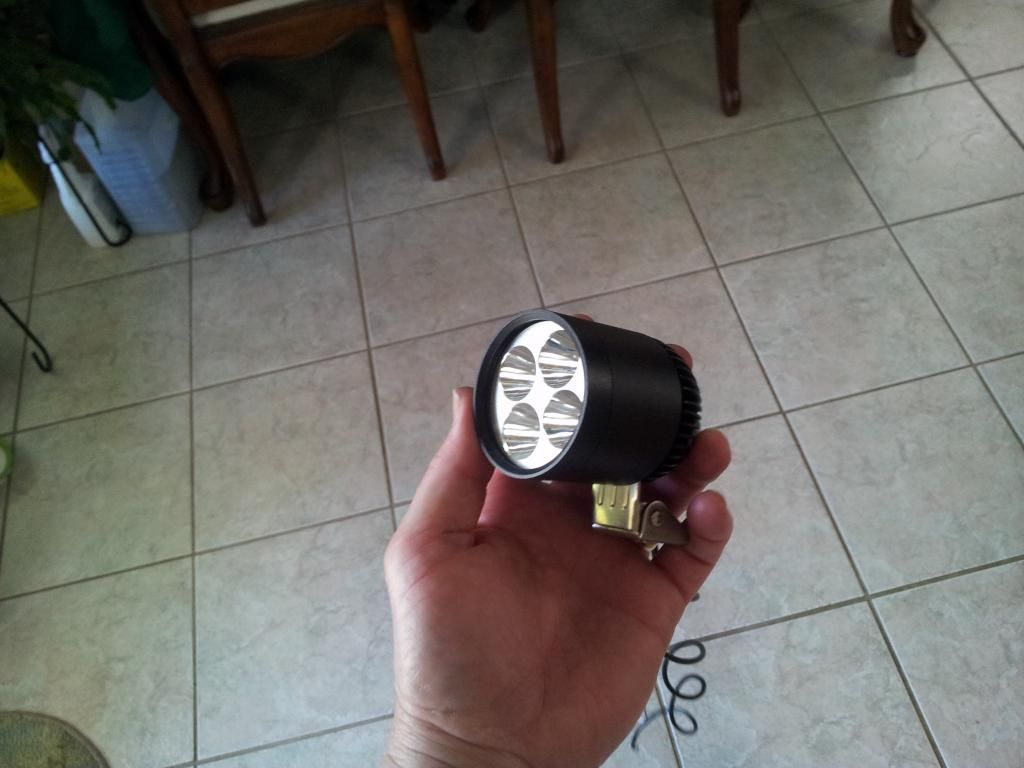 Did not learn my lesson from the Chinese tail light debacle. Found these on the net. If I'm right H4s produce about 1500 lumens (corrections welcome) and these were claimed to produce 3000 or 1800 from the 30 and 24 watt versions respectively. Yeah right. I ordered one of each thinking the 24 watter might make a good low beam. 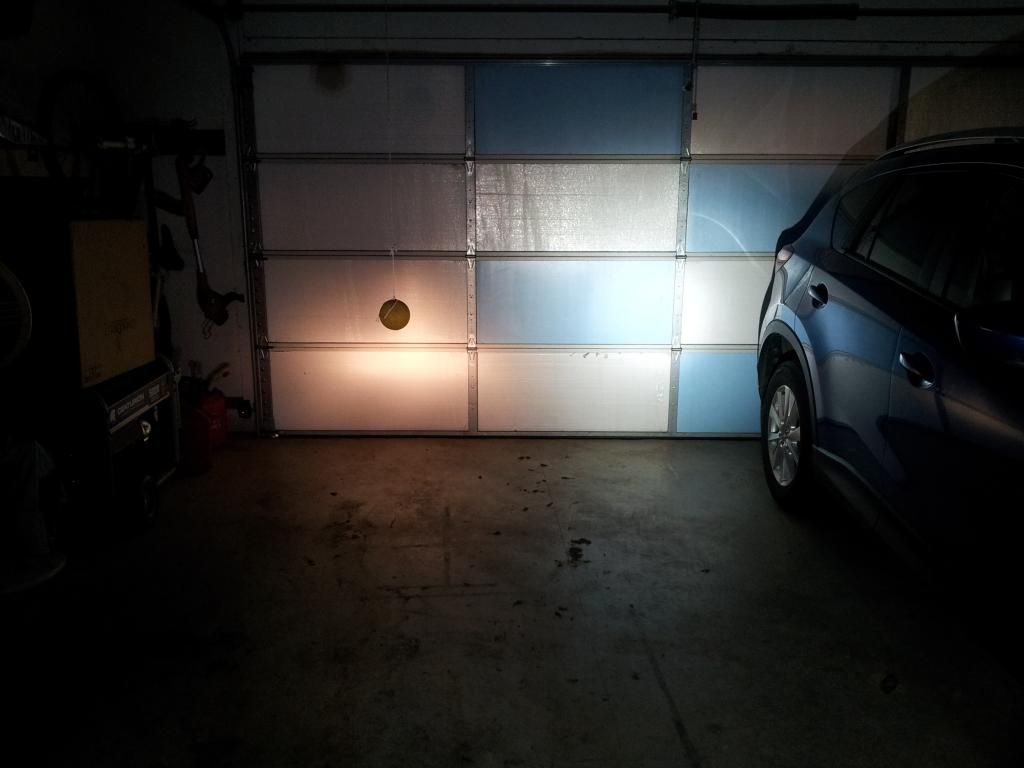 This picture is a comparison between my old H4 highbeam on the left and the 24 watt Cree light on the right. This is not your average H4 but Sylvania Silver Star Ultras I bought to counter the weakness of the 4" reflectors. If you are in front of the Cree, its like being in the beam of a train. Even with it pointed at the floor, I could not look into it directly as I could the H4. Tried putting a 6 ohm 50w resister in series with it and it is still way brighter than the h4. I have a 12/6 voltage reducer on order from (where else) Alebaba(China). Don't want to use these as just driving lights, which is their intended purpose, but to calm one of them down enough to provide a low beam that will not blind fellow motorist and allow me to ditch the h4s. Any experience here or am I plowing new ground? |
|
|
|
Post by liteway on Mar 15, 2019 19:27:40 GMT -5
Too bad their most likely on a hard circuit board. I would see about de-soldering 1 or 2 of the 4 and then wire it/them in with the highbeam. |
|
|
|
Post by liteway on Mar 15, 2019 19:28:17 GMT -5
You may be on to something. I would probably ruin them trying to rewire the board, but even a ham fist like me may be able to disable or cover one or two of the leds' on the 24 for the low beam and use that 30 watt torch for high. Or maybe a tinted cover. I'll wait to see how the voltage reducer works out before I try to alter the lights themselves. Lots of possibilities for dimming, glad I don't need them brighter. |
|
|
|
Post by liteway on Mar 15, 2019 19:28:48 GMT -5
|
|


 Looks like that front push rod suspension turned out nicely. I realize your shorter then me, but it still gets me when I see how short your wheel base is. I am pushing almost 95" and I could use an extra 2 inches to give my knees some more room. Also I know they are two force members but watch out for buckling on the push rods of that size, whats that OD? looks like 1/2". I also really like your sway bar setup, makes me think I could run that in mine but I think my knees would be unhappy.


 [/URL
[/URL


